Monday, September 22, 2014

day at the farmers market


Hola everybody! I went to the farmer's market this past weekend with my lovely mom and aunt and we hit the jack pot on some seriously FRESH and LOCAL goodies. Not to mention they were an amazing deal!

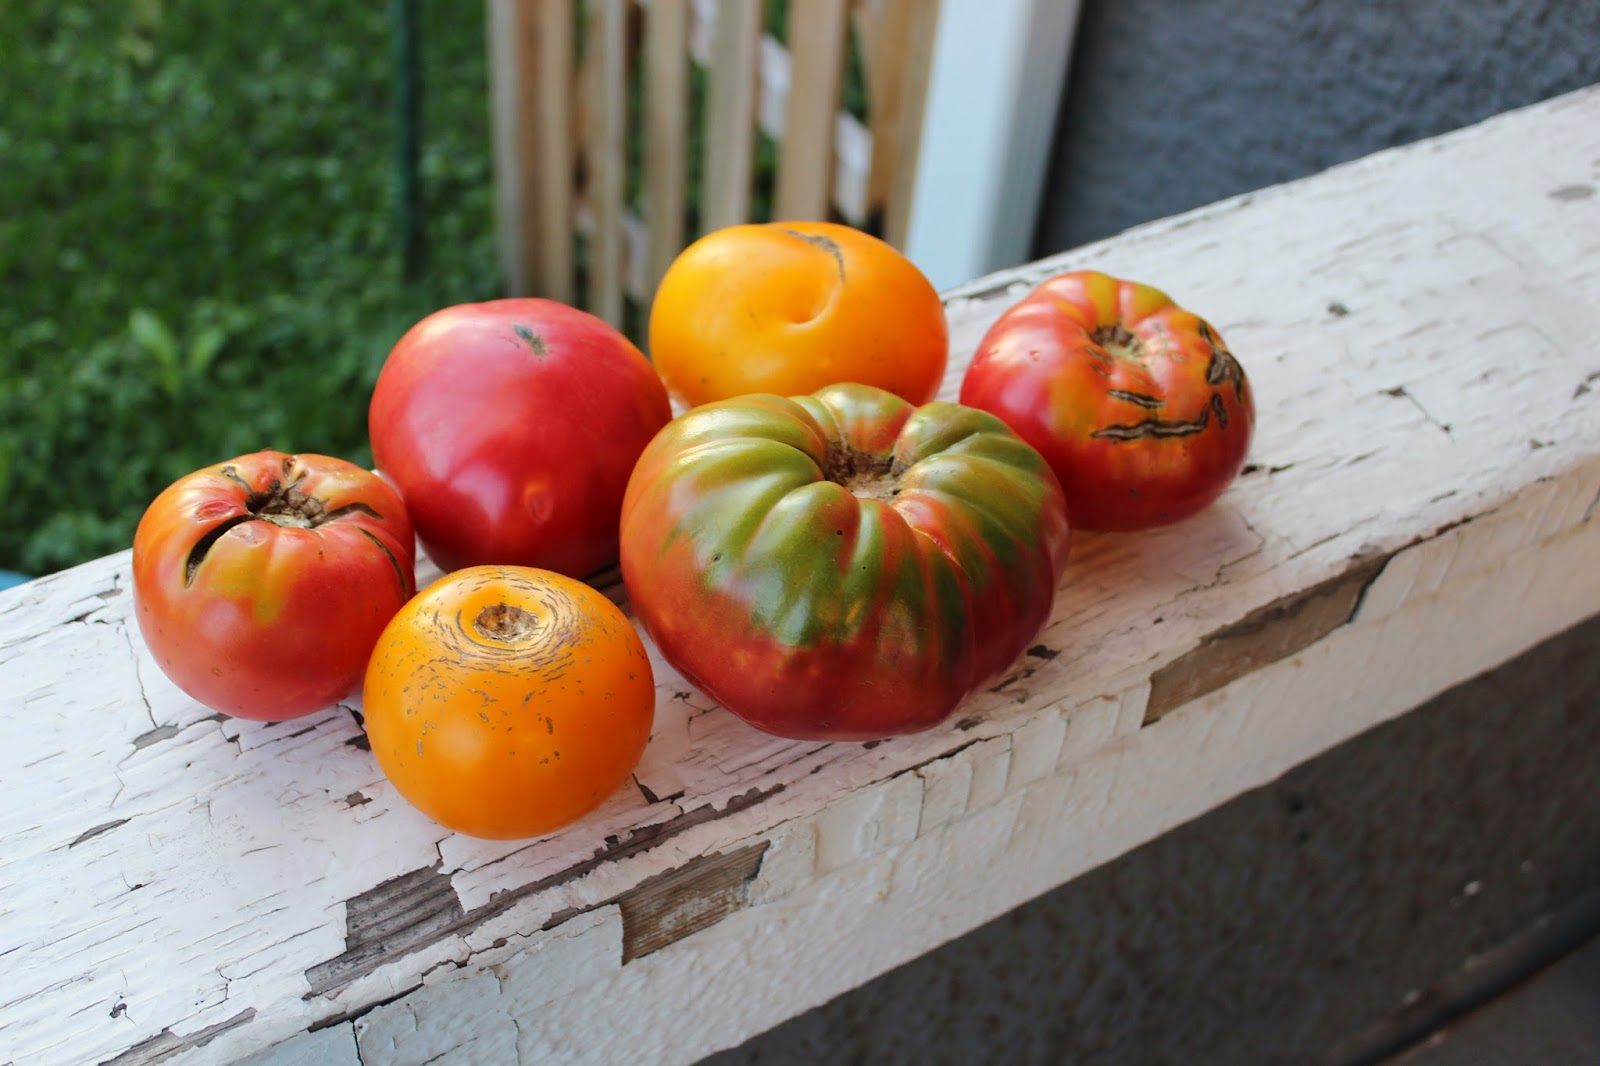
We got baby eggplant and green peppers 10 for $1 (YES, ONE DOLLAR) aka 10 cents a piece people. A beautiful, Organic 30 pound Moon and Stars heirloom watermelon for $10, the farmer gave me a discount for carrying the melon up to his register haha :) We also got 5 pounds of local, spray-free heirloom tomatoes for $10 (or $2/pound). I was so grateful to have gotten these when I saw the price of heirloom tomatoes at Whole Foods later that day - $6/pound at WF! Finally we picked up some shitaake mushrooms for $7, not a great deal but still nice to support local growers.

This just goes to show you that although some people think fresh produce is too expensive you can make it fit your budget if you know WHERE and WHEN to look. This means buying LOCAL and SEASONAL fruits and veggies as much as possible. Because when you buy something that was grown locally (within 200 miles or less of where you live) it will be fresher and most likely cheaper since the farmers don't have to pay as much to transport it. Buying produce in season is also very important in cutting costs and enhancing deliciousness!

I'm definitely no expert, but I found a ton of great resources - including the seasonality charts  - HERE on CUESA's website (stands for Center for Urban Education about Sustainable Agriculture) so make sure to check them out too! The charts on their website are specific to the greater Bay Area and may not be applicable to all regions, but are still a good guideline to help gain a basic understanding of what is in season when!

Warning: this post will be pretty much ALL pictures. But isn't that all we really care about when looking at blogs anyway...?


Tater Time :)


Beautiful, 30 pound baby! Organic Heirloom Moon and Stars Watermelon

Glad I got my tomatoes at the farmers market - these at Whole Foods were 3X the price! 


Eggplant Tan Lines :) 


Real Techniques: Review & Haul


I know a TON of people already know and love Real Techniques brushes, but I am finally jumping on the band wagon! I recently picked up the three brushes pictured above, from top to bottom they are the: Powder Brush, Blush Brush, and Expert Face brush. I have owned one Real Techniques brush before, the Setting Brush (shown below). I purchased the setting brush at Ulta probably close to 2 years ago and have been loving it. It has held up very well through travel, uses, and washing and has probably only shed a few hairs in all the time I've had it which is great. 


Since I loved the Setting Brush so much I don't know what took me so long to finally try out some of RT's other brushes but I'm so glad I finally did :) So to start off I'll just quickly mention the things I love about the brushes in general, then get in to the more specific details about each brush and what I like to use them for. 


So overall the thing I love most about these brushes is that they are soooo freaking SOFT!! I'm sure many of you who own one of these or who have felt one in a store can understand what I mean. With some brushes (even expensive/high end ones!) it can feel like the bristles are almost a bit sharp and pokey when the touch your face, but that is definitely not the case with these. I'm not sure if this has to do with the fact that they are synthetic or if it's how they're made and as long as they stay ultra soft and smooth I don't even care haha! Speaking of the fact that they're synthetic bristles, brings me to another thing I love about RT, all their products are Cruelty Free and not tested on animals! Although I do not exclusively use cruelty free makeup, I consider this to be a major bonus - props to the Chapman girls for keeping their products kind :) Another thing I have noticed, and loved, about RT brushes is that they seem to be very easy to clean. I can't say for sure, but I feel like it has to do with the fact that they are so fluffy and plush. Even though the brushes are all nicely full and dense the hair are long and very flexible, making it easier for the cleanser to do its job. The final thing I love about these brushes is the price. Here in the US, most of their face brushes range from 8 to 10 dollars, eye brushes are about $6, and they have some brush sets which range from $10-$18 depending on how many brushes it comes with. For the brushes I have I ended up paying: $9 each for the Expert Face Brush and Blush Brush, $10 for the large Powder Brush, and $8 for the Setting Brush, so 36 dollars for all four. I've also been loving the few Sigma brushes I have, and while they are more affordable than MAC they are still a bit on the pricey side (most eye brushes are $14+ and face brushes are $20-$30). So I would definitely recommend Real Techniques brushes to someone who is just getting in to makeup and doesn't have a fortune to spend on brushes or for anyone looking to expand their brush collection. They are such great quality you really can't go wrong! On to the specifics, first the Powder Brush...


This brush is BIG, almost like a kabuki I would say. But it is also super plush and does a nice job picking up product and dispersing it evenly. I mainly use this brush for either powder (MAC MSF Natural) or if I'm using an all-over bronzer and it does a great job for both of those purposes. I also really enjoy using this brush to help smooth and buff liquid foundation in to my skin after applying it with a BeautyBlender or my fingers to make it look more seamless. I probably wouldn't recommend using this to APPLY foundation, since its not quite dense enough, but I think it does an awesome job at smoothing out any lines and really helps you achieve a flawless look. Next, we have the Blush Brush...


I LOVE this brush! Like the others, it is super soft and fluffy, but because it is slightly tapered it still allows you to apply the blush precisely where you want it. I really love the tapered shape for this reason becuase sometimes when a blush brush is super fluffy it can spread the product around a bit "willy nilly" and leave you looking like you just sprinted a mile. Luckily, I haven't had that problem with this one! Since this brush is on the larger side you could also use it to powder your entire face. Last but certainly not least, the Expert Face Brush...


Let me just say that this brush has totally changed my opinion on using brushes for liquid foundation. Normally, if I'm wearing liquid foundation (which isn't super often - most days I don't wear makeup at all because I'm too busy hoarding it lol) I apply it with either my fingers or a BeautyBlender because I feel like, for me, it blends in best this way. If I use a brush, it usually makes my skin look patchy or leaves visible brush strokes - probably because I have very dry skin. However, with this expert face brush the foundation buffs in very smoothly without irritating my dry skin or leaving lines. I honestly don't know for sure what makes this brush so good for liquid foundation but these are my guesses: 1) the bristles are densely packed but still very flexible unlike some paddle-style foundation brushes which have more stiff hairs, and 2) the domed shape of the brush allows you to buff more smoothly than a flat top brush. Like I said those are just my guesses - but if anyone has other thoughts or ideas please let me know!

That pretty much sums up my little Real Techniques Review and Haul, hope it was helpful or interesting to somebody out there :) Have a great week everyone!

xoxo emma


Left to Right: Real Techniques Powder Brush, Blush Brush, and Expert Face Brush


Thursday, September 18, 2014

(simple) Heirloom Tomato Salad Recipe + 2 additional tomato recipes


I'm back with another quick and easy salad recipe! I recently went to a local farmers market with my mom and aunt and came back 5 pounds of beautiful, heirloom tomatoes (I am also working on another post about the other farmers market goodies so be on the lookout for that!). They were all super ripe and ready to go so I had to come up with some quick ways to prepare them. For this recipe I only ended up using one of the six tomatoes that I got because it was so HUGE! You could totally substitute multiple smaller Roma tomatoes, a pint of cherry tomatoes, or whatever else you have on hand. **Be sure to check out the two bonus tomato recipes at the bottom!**

 (simple) Heirloom Tomato Salad Recipe:
- 1 BIG tomato, or several smaller. This would also be great with cherry tomatoes
- 1 bunch of cilantro chopped (about 1/4 cup)
- 2 or 3 green onions chopped (about 1/4 cup)
- Half of a large avocado or a whole small one
- Season with salt and any other spices you like (such as cumin)
- Be grateful to your local farmers and ENJOY! :)


Tomatoes as big as yo face!!


Since I still had a lot of tomatoes left over I made a few other quick tomato meals including a SUPER easy "Gazpacho" and my take on Tabbouleh / Tabouli (sp?). Unfortunately I don't have a picture of the gazpacho but it was literally just diced up tomatoes with garlic and salt so you're not missing much. 

So to finish up the rest of the tomatoes I diced them all up in to smallish/medium sized chunks then placed them in a big bowl, making sure to get all the juices from the cutting board to the bowl. Since I had 5 pretty large tomatoes I'm estimating this ended up being about 5 or 6 cups once diced. I then added about 3 cloves of garlic, minced. This was the base for both the "Gazpacho" and Tabbouleh. After making the multi-purpose tomato 'Base' I just had to add a few finishing touches to achieve the two separate dishes. These recipes are below :) P.S. I only list the ingredients (not the method) because for both of these I literally just combined all the components in a large bowl and mixed - super simple!

 4 Ingredient "Gazpacho" Recipe:
- 1/2 of Tomato Base mentioned above, plus the majority of the liquid from this base (about 3 cups of diced tomatoes and 1.5 cloves minced garlic) -> I used all the liquid from the tomato base since I was going for a soup/gazpacho consistency, and my second recipe (the Tabbouleh) doesn't require any additional tomato juice or liquid
- 1/2 cup chopped parsley
- 1/2 to 1 tsp. coarse salt (depending on how salty you prefer it)


Fresh and Delicious Tabbouleh
- 1 cup (measured dry) of Freekeh or Bulgar cracked wheat (I like Freekeh because it sounds like FREAKY haha - the brand I used is Village Harvest Organic $10 for a 3 pound bag at Costco) >> combine with 2 and 1/4 cups of water and bring to boil, reduce to simmer, simmer covered for 12 mins, then remove from heat and let sit (still covered) while preparing other ingredients
- Remaining 1/2 of Tomato Base (about 3 cups of diced tomatoes and 1.5 cloves minced garlic)
- Juice of 2 Lemons (about 5 Tbsp - you can use less but I like it really lemony)
- 1 large Cucumber (I used the English / Hothouse variety b/c I prefer the thin skin and small seeds)
- 1 and 1/2 cup chopped Parsley (I know this sounds like a lot, but for good Tabbouleh you need it!)
- 2 Tbsp Olive Oil (this can be omitted if you want it to be oil free)
- Salt & Pepper to taste (about 1tsp pepper and 2 tsp salt)
- Optional: additional minced or granulated garlic for added flavor. A 1/4 cup of chopped Dill is another great addition!


DIY: Ombre Glitter Mirror


Let me just start out by saying that this project required a bit of trial and error - it didn't end up exactly how I imagined it. However, thats the beauty of this project, it doesn't have to be perfect and if you aren't thrilled with the way it turns out you can easily undo it and go back to the original. This will be fun for someone who is willing to experiment a little and spice up a plain mirror. Here's what you'll need: a frameless mirror (I found this one at Goodwill - if you don't have a thrift store near you try Ikea or a garage sale!), ModPodge - any finish will do but I used Glossy, a sponge brush (about 25 cents at a craft store like Michael's), painters tape, small bottle of white acrylic paint, and 2 or 3 jars of glitter in various shades (light to darker) of any color you like. If possible, do this outside. If that's not an option, cover the floor around your workspace with newspaper.

Start by taping the edges of your mirror with painters tape. This will help create a clean edge where the glitter meets the mirror and also makes it easy to remove the glitter if you decide you want a plain mirror down the line.

Next, paint over the blue tape using the white acrylic paint. This will make the glitter "pop" and stay more true to color. I messed this step up a bit because I brought the white paint beyond the tape, which made the glitter edge much thicker than I wanted. So I recommend keeping the paint only on the thin line of blue tape. Sometimes when it comes to glitter.... less is more.


Now its time to start adding glitter! I messed this part up a bit too haha, like I said this was a trial and error situation! At least I learned from it so now I can give better advice. So where I went wrong was the order I applied the glitter, starting with the lightest color on the inner edge and working towards darker on the outer edge. INSTEAD what I should have done was the OPPOSITE: start with the darker shade on the outer edge then work your way to the medium and light shades on the inside. When you go from DARK TO LIGHT the ombre effect will be very nice and gradual. However, since I went from light to dark, there were some areas that didn't blend as well. So please keep this in mind when looking at the pictures - instead of starting with light on the inner edge, start with dark on the outer edge and work your way lighter as you get closer to the inner edge. Hope that makes sense!


Apply a thin layer of ModPodge to the OUTER half of the white paint, then start adding your darker shade of glitter. After you have done this on all four edges allow it to dry for a bit (this doesn't take long). Then apply another thin layer of ModPodge on the middle third of the white paint, making sure it slightly overlaps the darker glitter you already applied. Then apply the medium toned shade and allow to dry. Finally, apply another thin layer of ModPodge to the inner portion of the white paint, slightly overlapping with the medium shade of glitter but not covering it totally. Then apply the lightest shade to the inner edge. After this has dried, apply one final coat of ModPodge over the entire glitter section to seal it and you're done! I know this isn't the best tutorial since I made a few mistakes along the way but I hope some of you still like it and get inspired to experiment with your own version. Thanks for checking this out and please let me know if you give it a try!


Finished Product
The Aftermath...
Glitter Vengeance.